1. Introducción
En este post vamos a configurar un servidor OAuth en Spring Boot. OAuth es un protocolo que permite la integración entre sistemas sin comprometer las credenciales de los usuarios. En el proceso de autenticación OAuth intervienen dos agentes. El servidor OAuth en donde se encuentra la información del usuario que puede ser accedida a través de apis y el cliente OAuth que desea integrar la información de los usuarios del servidor en su sistema. El proceso lo inicia el cliente solicitando al usuario permisos para consultar su información. El resultado de dicho proceso será la obtención de los tokens de acceso y refresco que permitirán finalmente consultar la información del usuario a través de las apis expuestas en el servidor.
La gran ventaja de OAuth es que las credenciales de los usuarios en el servidor no se ven comprometidas ya que el acceso a su información se hace a través de tokens que deberán ser validados cuando consumimos las apis.
Os podéis descargar el código de ejemplo de mi GitHub aquí.
Tecnologías empleadas:
- Java 8
- Gradle 3.1
- SpringBoot 1.5.2.RELEASE
- Spring 4.3.7.RELEASE
- SpringOAuth2 2.2.0.13.RELEASE
2. Creación de microservicio de ejemplo y securización
Lo primero que vamos a hacer es crear un microservicio de ejemplo en donde expondremos nuestra api que securizaremos utilizando Spring Security.
Añadimos las dependencias org.springframework.boot:spring-boot-starter-web, org.springframework.boot:spring-boot-starter-security, org.springframework.security.oauth:spring-security-oauth2 al fichero build.gradle
group 'com.jorgehernandezramirez.spring.springboot.oauth.server'
version '1.0-SNAPSHOT'

buildscript {
    repositories {
        mavenCentral()
    }
    dependencies {
        classpath("org.springframework.boot:spring-boot-gradle-plugin:1.5.2.RELEASE")
    }
}

apply plugin: 'java'
apply plugin: 'idea'
apply plugin: 'maven'
apply plugin: 'spring-boot'
apply plugin: 'io.spring.dependency-management'

dependencyManagement {
    imports {
        mavenBom 'org.springframework.cloud:spring-cloud-dependencies:Camden.SR6'
    }
}

sourceCompatibility = 1.8

springBoot {
    mainClass = "com.jorgehernandezramirez.spring.springboot.oauth.server.Application"
}

repositories {
    mavenCentral()
}

dependencies {
    compile("org.springframework.boot:spring-boot-starter-web")
    compile("org.springframework.boot:spring-boot-starter-security")
    compile("org.springframework.security.oauth:spring-security-oauth2")
}
Main que arranca SpringBoot.
package com.jorgehernandezramirez.spring.springboot.oauth.server;

import org.springframework.boot.SpringApplication;
import org.springframework.boot.autoconfigure.SpringBootApplication;

@SpringBootApplication
public class Application {

    public Application(){
        //For Spring
    }

    public static void main(String[] args) {
        SpringApplication.run(Application.class, args);
    }
}
Creamos los controladores ResourceController y UserController de test.
package com.jorgehernandezramirez.spring.springboot.oauth.server.controller;

import org.springframework.web.bind.annotation.RequestMapping;
import org.springframework.web.bind.annotation.RestController;

@RestController
public class ResourceController {

    public ResourceController(){
        //Para Spring
    }

    @RequestMapping("/public")
    public String getPublicResource(){
        return "Public Resource";
    }

    @RequestMapping("/private")
    public String getResource(){
        return "Private Resource";
    }

    @RequestMapping("/admin")
    public String getAdminResource(){
        return "Admin resource";
    }

    @RequestMapping("/admin/oauth")
    public String getAdminOAuth(){
        return "Admin OAuth resource";
    }
}
package com.jorgehernandezramirez.spring.springboot.oauth.server.controller;

import org.springframework.web.bind.annotation.RequestMapping;
import org.springframework.web.bind.annotation.RestController;

import java.security.Principal;

@RestController
public class UserController {

    public UserController(){
        //Para Spring
    }

    @RequestMapping("/user")
    public Principal getPublicResource(final Principal principal){
        return principal;
    }
}
A continuación procedemos a securizar la aplicación. Para ello creamos los siguientes usuarios en memoria
- admin
- jorge
y asignamos para cada url los siguientes permisos
- La url /public, /oauth/token y /oauth/authorize son públicas
- Para acceder a /admin el usuario deberá tener el rol ADMIN
- Para acceder a todas las demás urls se deberá estar autenticado
PD: Las urls /oauth/token y /oauth/authorize son las que intervendrán en el proceso de autenticación oauth.
package com.jorgehernandezramirez.spring.springboot.oauth.server.configuration;

import org.springframework.beans.factory.annotation.Autowired;
import org.springframework.context.annotation.Bean;
import org.springframework.context.annotation.Configuration;
import org.springframework.security.authentication.AuthenticationManager;
import org.springframework.security.config.annotation.authentication.builders.AuthenticationManagerBuilder;
import org.springframework.security.config.annotation.web.builders.HttpSecurity;
import org.springframework.security.config.annotation.web.configuration.EnableWebSecurity;
import org.springframework.security.config.annotation.web.configuration.WebSecurityConfigurerAdapter;

@Configuration
@EnableWebSecurity
public class SecurityConfiguration extends WebSecurityConfigurerAdapter {

    @Override
    protected void configure(HttpSecurity http) throws Exception {
        http
                .headers().frameOptions().disable()
                .and().authorizeRequests()
                .antMatchers("/oauth/token", "/oauth/authorize**", "/public").permitAll()
                .antMatchers("/admin").access("hasRole('ROLE_ADMIN')")
                .anyRequest().authenticated()
                .and()
                .formLogin()
                .permitAll()
                .and()
                .logout()
                .permitAll();
    }

    @Autowired
    public void globalUserDetails(AuthenticationManagerBuilder auth) throws Exception {
        auth.inMemoryAuthentication()
                .withUser("admin").password("admin").roles("ADMIN").and()
                .withUser("jorge").password("jorge").roles("USER");
    }

    @Override
    @Bean
    public AuthenticationManager authenticationManagerBean() throws Exception {
        return super.authenticationManagerBean();
    }
}
3. Configuración de servidor OAuth
Para configurar el servidor OAuth dentro de nuestro microservicio de SpringBoot deberemos configurar el servidor de autorización y de recursos.
- Servidor de autorización. Permite configurar los clientes oauth que son necesarios para realizar el proceso de autenticación
- Servidor de recursos. Permite securizar los recursos que van a ser accedidos a través de los token de acceso resultado del proceso de autenticación
Authorization Server
Para configurar un cliente oauth deberemos especificar:
- withClient. Id del cliente
- secret. Password del cliente
- authorizedGrantTypes. Tipo de permisos que le permitirán realizar operaciones en el proceso de autenticación oauth así como en la generación de tokens
- scopes. Ámbitos o conjunto de recursos, que los usuarios que se integran vía oauth, conceden al cliente para consultar sus datos.
- redirectUris. Url a la que se redirige una vez el proceso de autenticación oauth haya finalizado.
- accessTokenValiditySeconds. Tiempo en el que el access token es válido
- refreshTokenValiditySeconds. Tiempo en el que el refresh token es válido
package com.jorgehernandezramirez.spring.springboot.oauth.server.configuration;

import org.springframework.beans.factory.annotation.Autowired;
import org.springframework.beans.factory.annotation.Qualifier;
import org.springframework.context.annotation.Bean;
import org.springframework.context.annotation.Configuration;
import org.springframework.security.authentication.AuthenticationManager;
import org.springframework.security.oauth2.config.annotation.configurers.ClientDetailsServiceConfigurer;
import org.springframework.security.oauth2.config.annotation.web.configuration.AuthorizationServerConfigurerAdapter;
import org.springframework.security.oauth2.config.annotation.web.configuration.EnableAuthorizationServer;
import org.springframework.security.oauth2.config.annotation.web.configurers.AuthorizationServerEndpointsConfigurer;
import org.springframework.security.oauth2.config.annotation.web.configurers.AuthorizationServerSecurityConfigurer;
import org.springframework.security.oauth2.provider.ClientDetailsService;
import org.springframework.security.oauth2.provider.approval.ApprovalStore;
import org.springframework.security.oauth2.provider.approval.TokenApprovalStore;
import org.springframework.security.oauth2.provider.approval.TokenStoreUserApprovalHandler;
import org.springframework.security.oauth2.provider.approval.UserApprovalHandler;
import org.springframework.security.oauth2.provider.request.DefaultOAuth2RequestFactory;
import org.springframework.security.oauth2.provider.token.TokenStore;
import org.springframework.security.oauth2.provider.token.store.InMemoryTokenStore;

@Configuration
@EnableAuthorizationServer
public class AuthorizationServerConfiguration extends AuthorizationServerConfigurerAdapter {

    private static String REALM="MY_OAUTH_REALM";

    @Autowired
    private ClientDetailsService clientDetailsService;

    @Autowired
    private TokenStore tokenStore;

    @Autowired
    private UserApprovalHandler userApprovalHandler;

    @Autowired
    @Qualifier("authenticationManagerBean")
    private AuthenticationManager authenticationManager;

    @Override
    public void configure(ClientDetailsServiceConfigurer clients) throws Exception {
        clients.inMemory()
                .withClient("my-trusted-client")
                .secret("secret")
                .authorizedGrantTypes("password", "authorization_code", "refresh_token", "implicit", "client_credentials")
                .scopes("read")
                .redirectUris("http://example.com")
                .accessTokenValiditySeconds(300)
                .refreshTokenValiditySeconds(6000);
    }

    @Override
    public void configure(AuthorizationServerEndpointsConfigurer endpoints) throws Exception {
        endpoints.tokenStore(tokenStore).userApprovalHandler(userApprovalHandler)
                .authenticationManager(authenticationManager);
    }

    @Override
    public void configure(AuthorizationServerSecurityConfigurer oauthServer) throws Exception {
        oauthServer.realm(REALM + "/client");
    }

    @Bean
    public TokenStore tokenStore() {
        return new InMemoryTokenStore();
    }

    @Bean
    @Autowired
    public TokenStoreUserApprovalHandler userApprovalHandler(TokenStore tokenStore){
        TokenStoreUserApprovalHandler handler = new TokenStoreUserApprovalHandler();
        handler.setTokenStore(tokenStore);
        handler.setRequestFactory(new DefaultOAuth2RequestFactory(clientDetailsService));
        handler.setClientDetailsService(clientDetailsService);
        return handler;
    }

    @Bean
    @Autowired
    public ApprovalStore approvalStore(TokenStore tokenStore) throws Exception {
        TokenApprovalStore store = new TokenApprovalStore();
        store.setTokenStore(tokenStore);
        return store;
    }
}
Resource Server
package com.jorgehernandezramirez.spring.springboot.oauth.server.configuration;

import org.springframework.context.annotation.Configuration;
import org.springframework.core.annotation.Order;
import org.springframework.security.config.annotation.web.builders.HttpSecurity;
import org.springframework.security.oauth2.config.annotation.web.configuration.EnableResourceServer;
import org.springframework.security.oauth2.config.annotation.web.configuration.ResourceServerConfigurerAdapter;
import org.springframework.security.oauth2.config.annotation.web.configurers.ResourceServerSecurityConfigurer;
import org.springframework.security.oauth2.provider.error.OAuth2AccessDeniedHandler;

@Configuration
@EnableResourceServer
public class ResourceServerConfiguration extends ResourceServerConfigurerAdapter {

    private static final String RESOURCE_ID = "my_rest_api";

    @Override
    public void configure(ResourceServerSecurityConfigurer resources) {
        resources.resourceId(RESOURCE_ID).stateless(false);
    }

    @Override
    public void configure(HttpSecurity http) throws Exception {
        http.
                anonymous().disable().
                headers().frameOptions().disable()
                .and().requestMatchers().antMatchers("/private", "/admin", "/admin/oauth", "/user")
                .and().authorizeRequests()
                .antMatchers("/private", "/user").authenticated()
                .antMatchers("/admin").access("hasRole('ROLE_ADMIN')")
                .antMatchers("/admin/oauth").access("#oauth2.hasScope('read')")
                .and().exceptionHandling().accessDeniedHandler(new OAuth2AccessDeniedHandler());
    }
}
Asignamos el orden para el filtro del servidor de recursos a 3. Según la release de Spring-Boot-1.5 se cambió de 3 a SecurityProperties.ACCESS_OVERRIDE_ORDER - 1 en esta versión. Es necesario cambiarlo a 3 ya que al acceder a las apis del servidor a través del token de acceso es necesario que este filtro salte antes que el filtro de seguridad por defecto.
4. Probando la aplicación
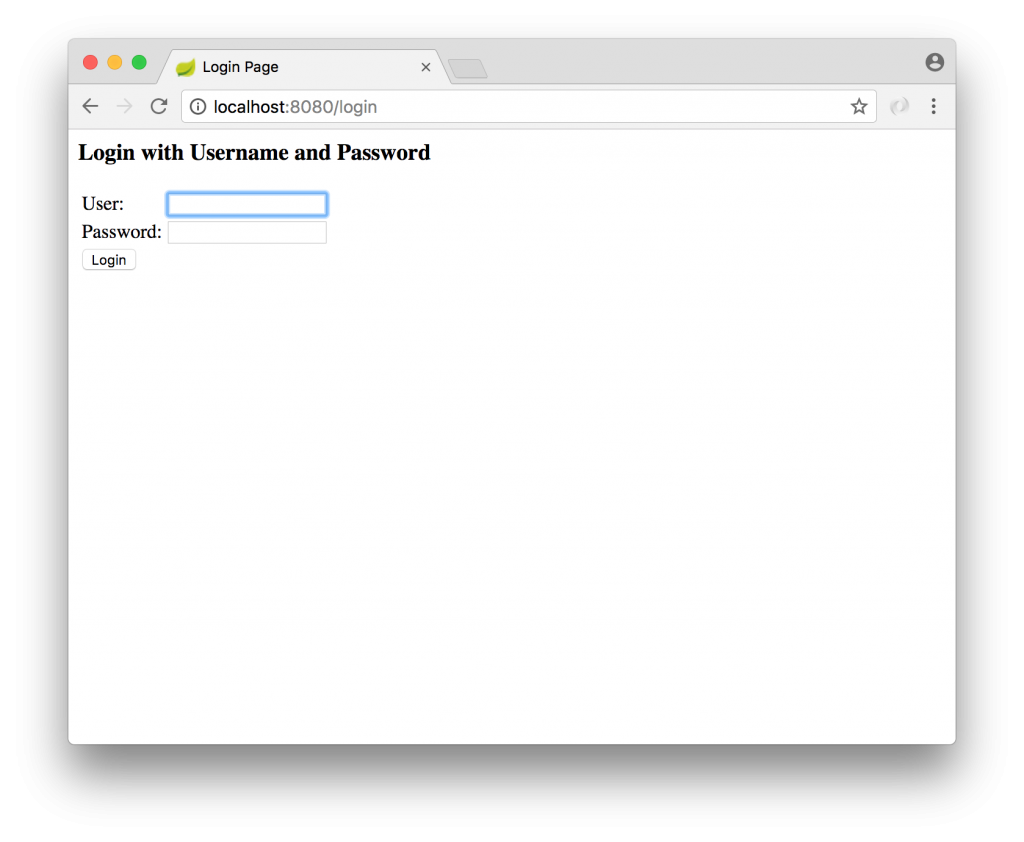
El proceso de autenticación oauth empieza mostrándole al usuario el formulario de login de la aplicación que queremos integrar. Debemos ejecutar la siguiente url en el navegador indicando los siguientes parámetros
- El id del cliente
- La url de redirección
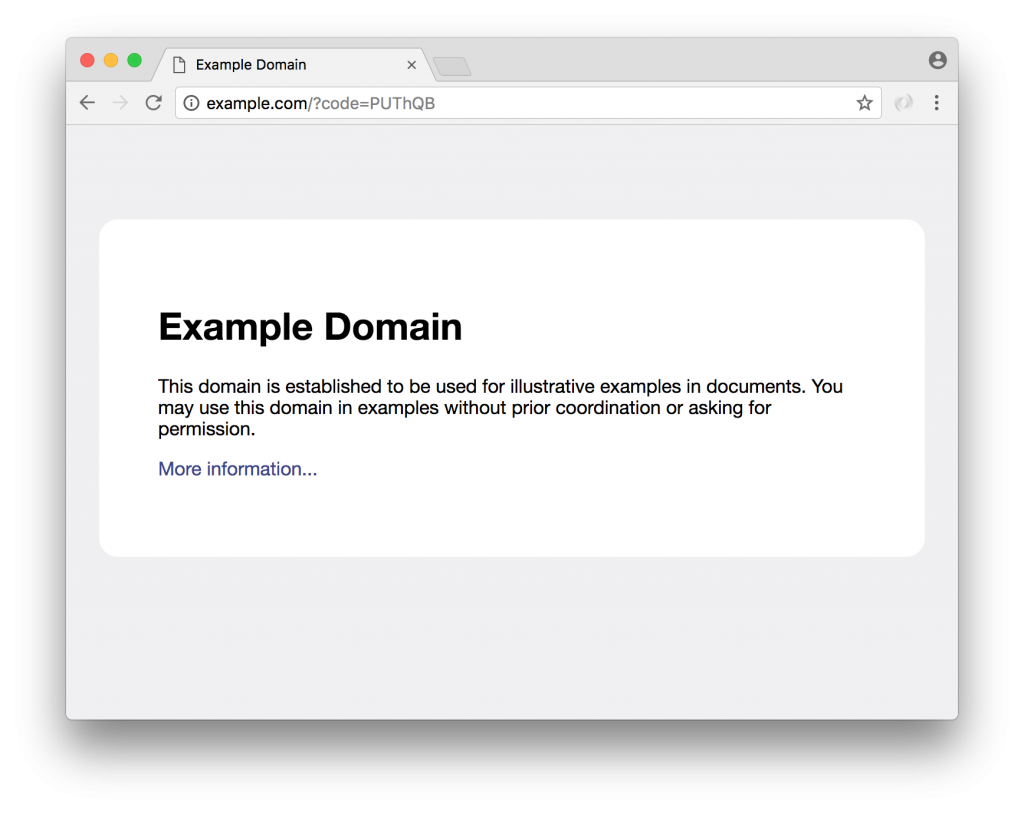
El resultado de este proceso será la obtención del parámetro code.
http://localhost:8080/oauth/authorize?response_type=code&client_id=my-trusted-client&redirect_uri=http://example.com
Procedemos a logarnos con un usuario del sistema

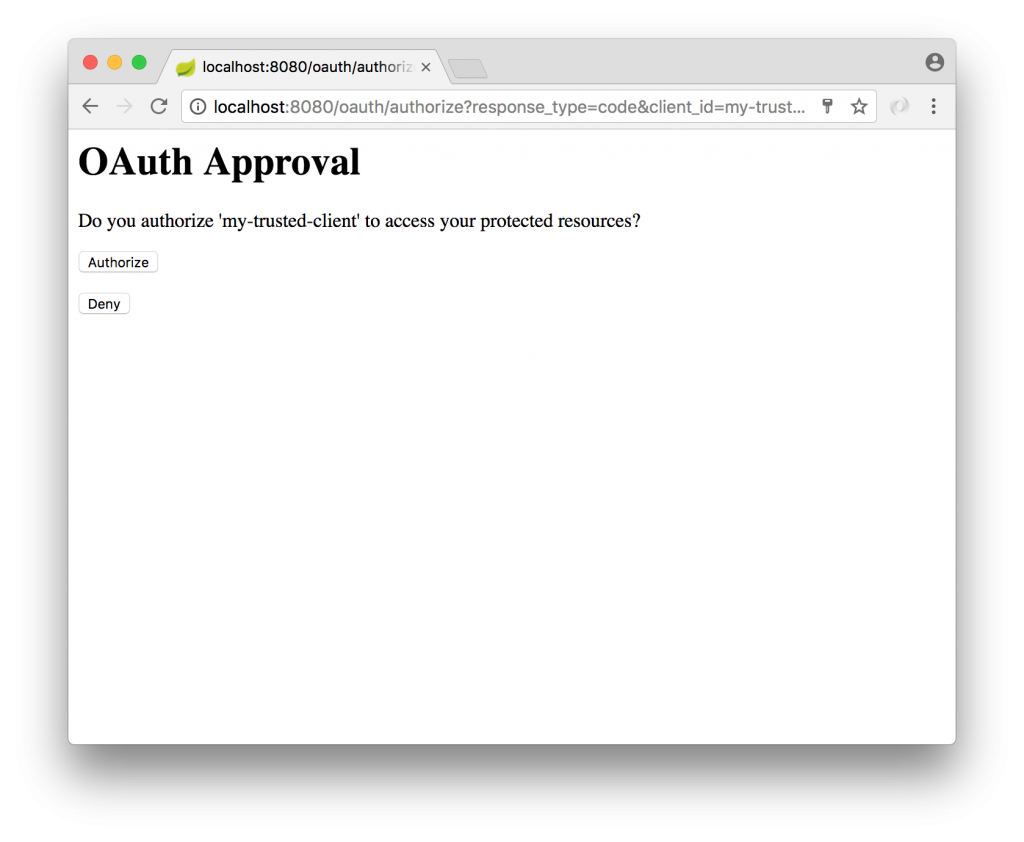
Se nos muestra la pantalla de aprobación en donde el usuario concede permisos al cliente my-trusted-client para acceder a sus recursos.

Finalmente el proceso nos lleva a la url de redirección asociada a nuestro cliente pasando el parámetro code.

Obtener access y refresh token
A continuación obtenemos los token de acceso y refresco a partir del parámetro code obtenido en el paso anterior. La diferencia entre ellos es que el token de acceso tiene generalmente un tiempo de vida más corto y se utiliza para acceder a las apis del sistema, mientras que el token de refresco tiene un tiempo de vida más largo y se utiliza para generar otros token de acceso.
curl -v -X POST http://localhost:8080/oauth/token --data "grant_type=authorization_code&client_id=my-trusted-client&redirect_uri=http://example.com&code=<strong>PUThQB</strong>" --user my-trusted-client:secret -H "Accept:application/json"
Resultado
{“access_token”:”20b5c304-d321-4acd-9452-a8df67a07c36″,”token_type”:”bearer”,”refresh_token”:”f47bf0c8-f7a8-4b4f-9e76-3e64fa71b202″,”expires_in”:299,”scope”:”read”}
Atacando la api
Podemos consumir la api del servidor de dos maneras. Pasándo el token de acceso en el parámetro access_token
o pasando el token de acceso en la cabecera de autorización Authorization.
curl -v -X GET http://localhost:8080/admin-H "Authorization:Bearer 20b5c304-d321-4acd-9452-a8df67a07c36"
Resultado
Admin resource
Refrescando el token
El token de refresco sirve para generar otros token de acceso.
curl -v -X POST http://localhost:8080/oauth/token --data "grant_type=refresh_token&refresh_token=f47bf0c8-f7a8-4b4f-9e76-3e64fa71b202" --user my-trusted-client:secret -H "Accept:application/json"
{“access_token”:”ada3866e-19b3-4af2-820a-55e8c68dbbfd”,”token_type”:”bearer”,”refresh_token”:”f47bf0c8-f7a8-4b4f-9e76-3e64fa71b202″,”expires_in”:300,”scope”:”read”}